Guess what!? Some of my designs are now available as digital embroidery patterns through OESD on Embroidery Online! There are 25 designs in our first collection, Trucks and Transport, and I think they might be just the thing for little boys who love big machines. Fire trucks, earth movers, cement mixers, and even a trash truck and traffic cones. The designs are available for use with just about any embroidery machine and can be
downloaded from Embroidery Online or your can order a CD.
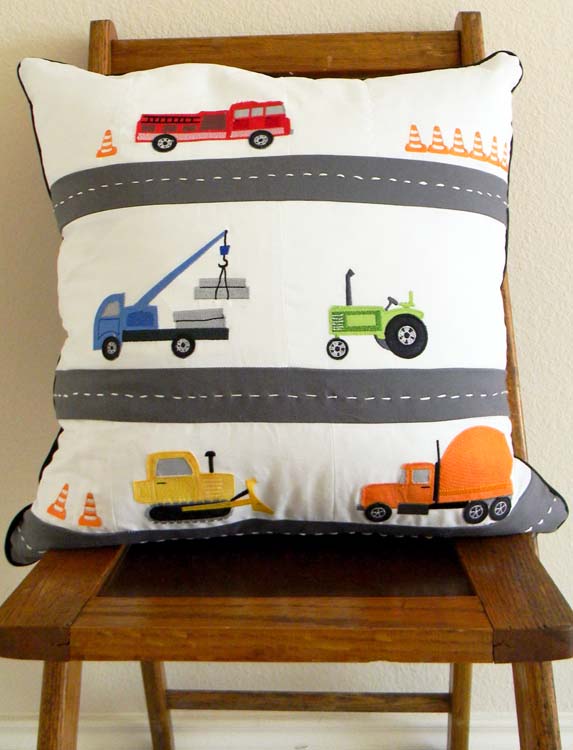
My current sewing arsenal doesn't include an embroidery machine in its ranks, so the team over at Embroidery Online stitched up some of the applique samples for me and I designs and sewed up these 2 cutie pie Trucks and Transport pillows. What do you think?!
And the backs!
Look at all of the fabulous little details that are worked in automatically using the embroidery patterns!
(Basic instructions for the pillows are listed at the end of this post, along with a few work in progress shots to help illustrate how I put everything together.)
Oh, and guess what else? Robert Kaufman will be releasing a coordinating line of fabric this fall. Fabric AND coordinating embroidery designs. Squee!! So excited!!
All the thread you need for the Trucks and Transport designs come in a handy 26-spool (600 yard) collection of Timeless Thread. And the team at Embroidery Online has a complete thread set (valued at $78) to share with one of you! Just leave me a comment here before the morning of 2/10/13 when I'll randomly choose a winner. I'd love to hear how many of you have an embroidery machine or if your sewing machine has embroidery capabilities. And if you don't, is a machine on your wish list like it is on mine?
Here's a preview of all 26 designs in the
Trucks and Transport embroidery patterns collection!
Here are some guidelines for you on how I made my pillow covers.
Embroidery Motifs (each done on a single piece of white quilting weight cotton) with lots of extra space for trimming
1 - Trash truck - 4" wide
1 - Dump truck - 4" wide
2 - Cement trucks - 5" wide
2 - Flat bed trucks - 5" wide
1 - Fire engine - 5" wide
1 - School bus - 5" wide
1 - Tractor - 3" wide
1 - Earth mover - 4" wide
4 - cones group of 6 - 1 inch tall
8 - cones single - 1 inch tall
2 of each - text - 1 inch tall
Other supplies:
I used white quilting cotton for stitching the embroidery motifs and for piecing the pillow
A dark grey quilting cotton for the road strips and orange quilting cotton for the stripes on the back
White cotton embroidery floss
2 orange 20" invisible zippers
Black pipping
Finished pillow size - 19" x 19"
Use 1/4" seam allowances for piecing
1. Trim the bottom edge of the fabric for each stitched motif leaving 2" between the bottom of the motif and the bottom of the fabric
2. Layout the strips in order, stacking and folding to get a sense of how you want to compose your pillows. Once finished, your strips will be 21 or 22" wide, so as you lay everything out work with that as your width. Here's a guide I used for a rough height of each of my strips:
| white (top) |
5.5 |
| grey |
2.25 |
| white |
5.5 |
| grey |
2.25 |
| white |
4 |
| grey |
3 |
See how they're just sort of folded into place for positioning?
3. Now that you're sure of your layout, trim the bottom of the fabric for each stitched motif to leave 1/2" of white space below the motif.
4. Sew each of the white stripes (left to right with 1/4" seams) piecing the elements together to leave roughly the same spacing between elements that you laid out in 2. Remember, its an art not a science, so don't worry about making spacing between elements perfect.
5. Make sure that each row is at least 21 or 22" wide so you have some extra to trim later
6. After you sew the 3 white strips, trim them to the heights listed above
7. After you sew all the strips, start piecing the strips together. Start with the 3" grey strip at the bottom and work your way up to the top
8. For the back of the pillows, I followed the same basic idea but added an invisible zipper below the top orange panel.
9. Use an embroidery hoop and hand embroider the white road lines onto the grey strips.
10. Trim to 19" x 19"
11. When sewing the front to back, I added a basic black pipping to give the pillow a nice finish. I always, use 20" pillow down forms in 19" cases so they are nice and full and fluffy.